Sunday 22 March 2015

The Final Outcome

This is what the final version of the model looks like:


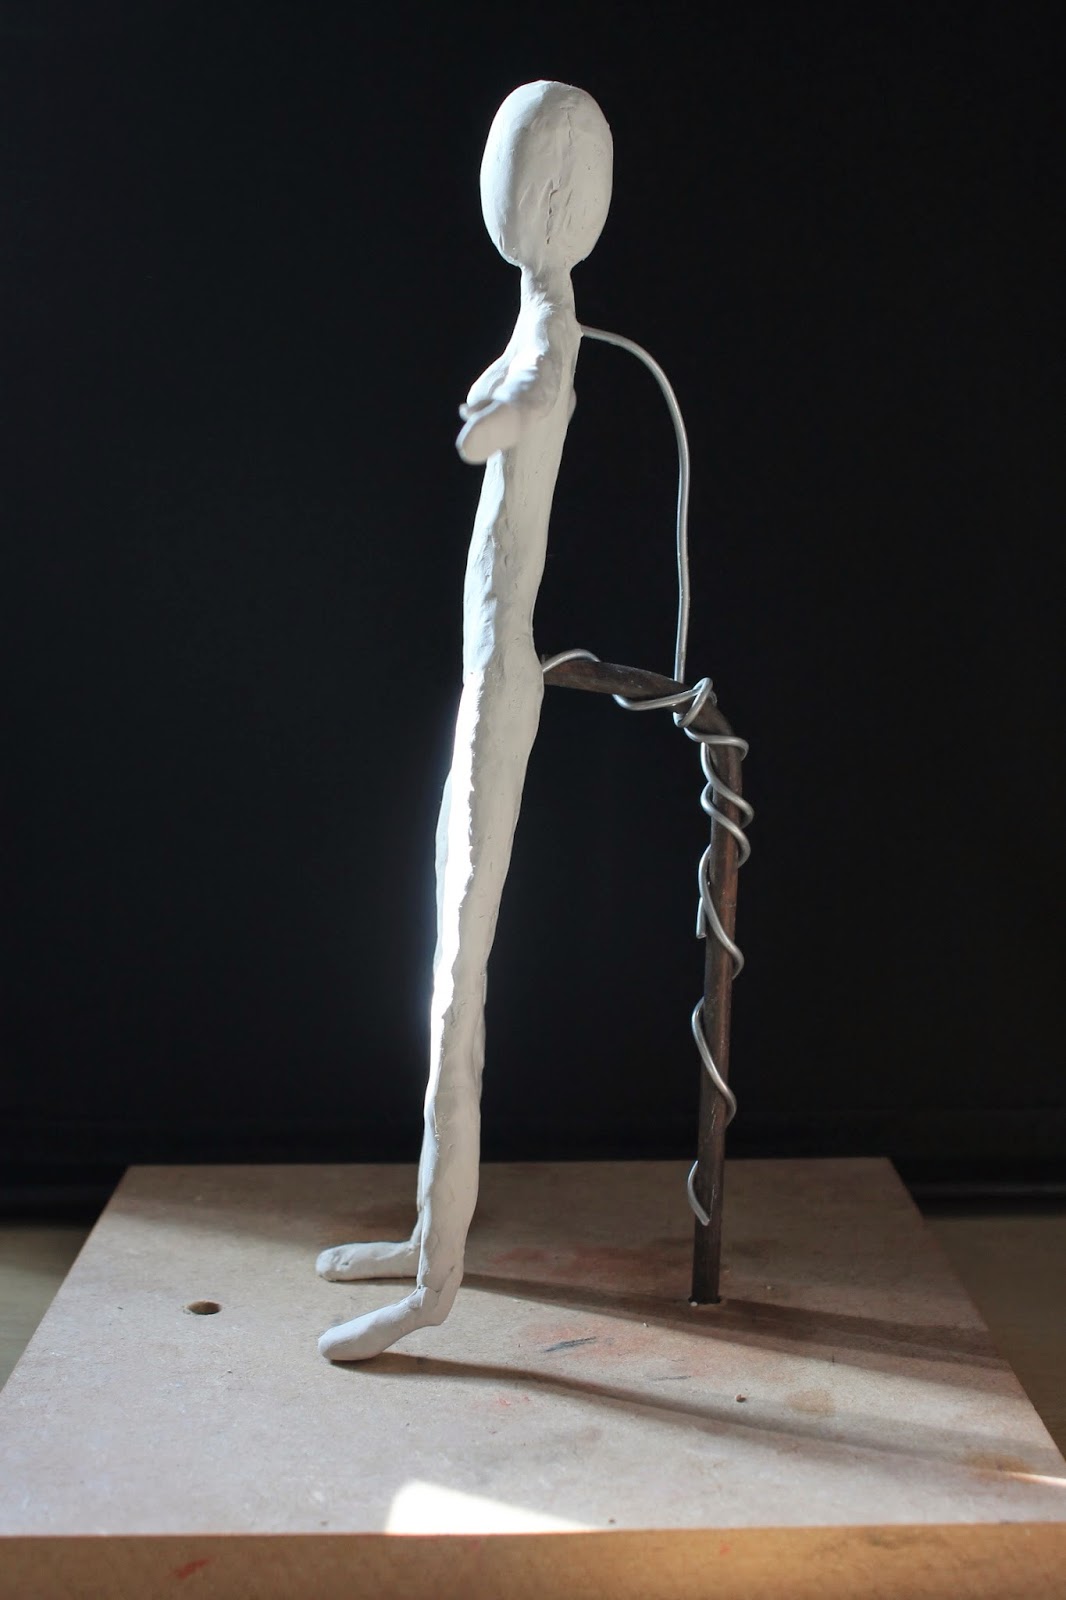
As you can see below, from the side she looks very flat. During construction I realised I had set the wire frame too close to the supporting rod, so I could not effectively replicate the back in the right proportions. So instead I decided to mainly focus on what how she looks from the front; this allowed me more time to get the body shapes right in comparison.


The process of making the model was enjoyable. The arms and legs were harder to manipulate and get right then I had anticipated, but after I had established them the rest of it was relatively straight forward. It was difficult to make the model smooth, since I kept working on different sections which messed up the other areas. 


If I could go back over it and improve the model, I would have been more careful with positioning the wire frame, and spent more time applying plasticine to the legs, as I feel that I could have emphasised them more. Looking back at the images, the torso could also have been further emphasised; I would have added more to the left side with the realistic proportions, because now both sides of the model look very thin.

However I am still happy with the final outcome overall, I was able to practice my skills as I applied and smoothed the plasticine onto the wire frame, as well as discovering where I can improve next time I make one. The concept of comparing the two figures and representing how ridiculously different they are is still there, and hopefully that will spark an interest in people that view it.


Process of Making the Model Continued


Plasticine application of the breasts
and legs
Continuing on from my previous post, the model is starting to look more established.

After finishing the torso, I could add more plasticine to get the right leg shapes. The two are very different in the drawing, which I believe I have portrayed fairly-well in my model. Having said that, looking back at it I could have emphasised the difference between them even more with more plasticine on the left or less plasticine on the right.

The breasts proved to be slightly more difficult to mold; since they both join in the middle so close together it was hard to smooth them both out. However, starting with the right (Barbie's), I could pin point how big it should be, so I could compare and contrast the second breast to look more natural.

Once this was done, I could roll out a head with my remaining plasticine. I decided the easiest way to make it would be to roll out a ball of the right shape, cut it in half, then molded it back together over the wire frame. This turned out to be fairly easy, and it gave me the chance to finish off making the neck so it looks better than previously.

Applying the head and hands
After this it was just the hands and feet left to add. Starting with the hands, since they turned out to be fairly small I decided to create them to look more like mittens with a thumb to indicate the angle of the hand. I think this looks good, because it doesn't detract from the rest of the model, and you can still tell the difference between the two in the general shape.

I decided applying the feet at the end would be easier, since most of the time I had to move the model around to smooth the plasticine out. This way I could put the feet on at the end and stick them to the board, so that it stands in place as it is finished. Adding them on didn't take long and getting the right shape wasn't too hard, but only the flat foot actually stays on the ground.
Addition of the feet

Saturday 21 March 2015

Process of Making the Model


Wire frame with millilput
So I finally started making my model!

After getting all of the tools I need; a wooden base, metal rod, aluminium wire, fresh milliput and carving tools, the first task I had to do was bend and cut the wire into the right shape.

The wire was fairly easy to manipulate, since it's thick, soft, and easy to cut with scissors; so I could bend it around the metal rod on the stand to attach to my model.

The way in which I attached it all was with milliput. After making 3 wire parts to stick together (the torso/head, the legs and the arms) I mixed the two elements of the milliput together to form a mixed substance. This hardens after an hour, so applying it to the wire in the right places can form the muscle of your armature (for example the image on the top left).

A problem that occured while applying the milliput was that the top half of the model was very heavy, so wouldn't stay up right as the milliput was setting; to resolve this I wrapped another piece of aluminium wire around the rod and set it into the top half of the torso. This allowed it to stay upright so it could set properly.

Base layer of plasticine
After this part was done, I applied a base coat to my model. I did this to establish the areas on which I would be molding and so I can apply the right amounts of plasticine to it. With just the base coat on, the proportions look strange and slightly wrong in places such as the neck.

Despite this I carried on with my plan to shape the top half of the model. The arms were the hardest part to manipulate since I had to apply elbows to it, which was awkward to shape. However once I had done this I could start building up the shoulders, which made the neck look better.

The torso overall was the most fun part for me to do; This is where I could get the most emphasis on the shapes to really show the difference between the two figures. I didn't encounter any problems with this section, it was just about applying the right amount of plasticine and spreading it evenly.

So far I believe I have done well with developing my model. Using my drawing as reference to make sure each shape it right. I am looking forward to carrying it on and getting to the next stage of the process!
Applying the basic shape of the torso

Wednesday 18 March 2015

Analysis of a Text

Don't Bet On The Prince

This is a book I have read in research for my essay. It contains a series of essays and fairy tales that have been written since the 1960s, when the feminist movement started. Published in 1987 and edited by Jack Zipes, this famous author compiled these texts together to demonstrate how recent male and female writers have reflected on and re constructed traditional fairy tales, which have clear, sexist gender roles; showing the male to be dominant in the stories, with the women as props to the plot.

With authors referenced such as Joanna Russ, Tanith Lee and Jane Yolen, this book gives examples of how we can adapt old literature to create a new outlook on the world. It is targeted at people who are interested in an alternative fairy tale, who question what has caused such different, sexist expectations from both genders and an alternative view on the traditional values of society.

The text is organised into a series of chapters, ordered from feminist fairy tales for young and old readers (parts 1 and 2) to the criticising essays. This makes the book flow nicely and easy to read as it shows you examples of the feminist fairy tales first before taking you to criticise them.

The author of this text is mainly analysing the opinions of others and inputing his own thoughts to compare with others; he can tell that some of the writers might not consider themselves a feminist, despite every author demonstrating similar views of feminism to each other. Saying this, it is mainly in the introduction that Zipes gives his input to the other authors work, allowing the readers to form their own opinions of the works as they read the book.

I have personally found this book useful to depict and form opinions on, because some clear statements are presented in an easy to read format, which has allowed me to understand Zipes's opinion and add my own points to it. It has been interesting to see alternative fairy tales, particularly the interpretation of Snow White from 1972. This interpretation shows Snow White standing up for what she wants, to be with her friends, rather than become a princess as the Queen would have granted. Minus the Queen's death at the end, this story would be a much better one to read to children compared to the Disney version, since it demonstrates empowerment to good people.

In conclusion, I believe this is a good book to read to gain an alternative view on fairy tales. Compared to 'Grimm's Fairy Tales' by Brother's Grimm, these stories are generally much more child-friendly and empowering to women, with analysis at the end of the book describing how feminist values are not present in old stories such as the Grimm tales.
A lot of references are used, whole previously written texts even, which means Zipes must have done some good research into writing this book, and that is why I trust the opinions that are stated in the text.


Friday 13 March 2015

A Change in Plans...

So far I have talked about making two armature's of realistic proportions and a Barbie-shaped one. However after evaluating my idea, I decided merging the two into one model would be the best way to go.

This should make my work more interesting and dynamic, which will hopefully give viewers a direct comparison of how different the two body proportions are, raising awareness of the issues within society.

It also allows me the chance to practice the process of making an armature model; mixing milliput, creating a wire frame and base, then applying plasticine to it.

The fact that I am only making a model, without animating it, gives me more time to focus on making the one piece of work look good while still making it relate well to my essay subject.

Here is the final model design, with the wire frame drawn on as reference:


Sunday 1 March 2015

My Final Idea

For my final piece, I would like to make two models. One with realistic body proportions, and one shaped like a barbie doll.

Realistic Figure

Barbie Figure

In my essay I discuss the issues with different body shapes, and how the media enforce high expectations of how your body should look. So I am going to make both of these to compare the proportions and show how ridiculous Barbie's shape is, so I can encourage the fact that natural beauty is better.

I intend to make them with plasticine, using milliput, wire and two wooden bases to construct them.