To create the first draft of animatic, I used frames from my storyboard. As discussed before, I didn't spend much time on the storyboard, which meant it translated to animatic form badly; however it did give me a good idea on how to time the scenes in my final animation.
To refine the animatic I plan to take images to replace the storyboard drawings, which will look like actual frames. This should portray a better idea of what is happening so the audience can compare the overall look of each technique, from how it would have looked if it were animated. I have already given an example of this with the very first image, of my hand drawing on paper; I think it looks so much better then my storyboard drawings already, so I will carry on to get the finished piece to this standard.
I won't have time to finish the whole animation due to my bad time management - but I will complete at least the 3D animation since that is the most efficient technique to work in and I can work on it from my laptop.
Monday 28 December 2015
Monday 21 December 2015
Paranorman - Analysis
'Paranorman' is a good example of combining stop motion and 3D animation. The eery theme of the story is animated really well with replacement animation; where the characters faces are animated in 3D and powder printed, painted, and replaced onto each frame. It has proven to be an accurate way to animate, since every facial expression fits perfectly onto the model. Here's my initial thoughts on the film:

Laika are the main company using this technique at the moment; though none of their films have been majorly successful yet, there are plans for at least three more films using this animation technique, and if the box office numbers prove anything it's that their films get better each time, so maybe one day it will be able to compete with CG animation.
This will be the other hybridity case study I write in my dissertation, since I want to explore a variety of hybrid examples.
Tuesday 15 December 2015
Paperman - Analysis
'Paperman' is one of the first public examples of the capabilities with hybridizing techniques. Combining the traditional concept art drawings with animating in 3D software, I found this to be a beautiful piece of work, my initial thoughts on it are in notes:


What this film has demonstrated for me is the possibility of using this technique in the future; as technology develops, it is becoming increasingly popular to try new methods of animating, which is exactly what has happened at Disney studios.
If I had considered it sooner, I would have allowed myself time to animate in a hybridizing format for my practical work, since I believe this is becoming a relevant technique to use for the future. Though I didn't get chance to animate it, I will at least include a case study of hybrid animation, including an analysis of 'Paperman'.
Saturday 12 December 2015
Final Character Design
After experimenting with various character rigs in Maya, I have decided to use Moom for my final piece. Since Moom is the rig I am most familiar with and due to the time limit left on this project, this seemed to be the smartest option for me.
In my final piece I will be focusing on the animation, and the benefits and drawbacks to each technique. A drawback I have found for Stop Motion so far is that I cannot replicate Moom's character design in plasticine, due to his limbs naturally hovering apart, which is near-impossible in stop motion puppets. If I have time I could alter Moom's design so that the stomach is joint together, which would make it a slightly better comparison, but I think I could settle for using these character alterations here:


In my final piece I will be focusing on the animation, and the benefits and drawbacks to each technique. A drawback I have found for Stop Motion so far is that I cannot replicate Moom's character design in plasticine, due to his limbs naturally hovering apart, which is near-impossible in stop motion puppets. If I have time I could alter Moom's design so that the stomach is joint together, which would make it a slightly better comparison, but I think I could settle for using these character alterations here:


Friday 11 December 2015
Academic Poster
As part of our module, it was required that I create an academic poster describing what I've been researching for my dissertation and creating practically. I look at it as a summary of what my project's about, which I have displayed here:


Overall I received good feedback on the poster; there's roughly an equal amount of text and images in a simple layout that's "not too busy", which makes it easier to look through, I matched the colour scheme of the titles with my stop motion character, and some people even said seeing the images of my idea made them want to see it animated!
This gives me more confidence in my work as I start to build my final piece.
Historical Timeline... Bad Time Management
Unfortunately I won't have enough time to illustrate a timeline of the key historical events in animation. Since I have delayed starting my animated practical work I know that I won't be able to produce a decent quality piece of work within the time that I have left on this module.
However instead I will be structuring my dissertation differently; listing the key historical developments in the first three chapters, representing the three main techniques I want to compare, which will lead on to my analysis and comparison of each in the second half of the text. This will ultimately work out better for me, since it will be a manageable amount of work and I will still have the chance to portray the information I find while researching.
However instead I will be structuring my dissertation differently; listing the key historical developments in the first three chapters, representing the three main techniques I want to compare, which will lead on to my analysis and comparison of each in the second half of the text. This will ultimately work out better for me, since it will be a manageable amount of work and I will still have the chance to portray the information I find while researching.
Sunday 6 December 2015
Barry Purves Talk
Earlier this week, the famous Barry Purves came into the Leeds College of Art to talk to my class about storytelling through animation. He did this by showcasing two of his films and then walking us through both frame by frame, describing his thought process and explaining why the shot is good or bad.
Purves really loves the concept of theatre and acting; he didn't do well in his initial acting career so decided to translate that passion into animation. He believes stop motion has the most in common with the theatre, since they both use props, make up and sets to portray their stories.
One of my classmates asked Purves to explain the reason he believes practitioners still use stop motion today, despite computer generated imagery being developed. He stated it is because in a way, it's the most relatable animation technique to audiences; seeing puppets and common materials come to life through animation to a lot of people is astounding. Though CGI has many positives, because of the space within the computer, they are able to put cameras where it is not possible in real life, so this and the plastic feel of the characters make CG seem slightly less believable. Whereas with stop motion, all you need to see is a few props and hints of a story, so that the viewer can fill in the gaps themselves and turn it into a story that they will enjoy more.
The audience is naturally more aware of what a stop motion puppet is, what it's made up of and the materials used to build it; this is why seeing it come to life through animation, breathing, talking and feeling emotions, is considered to be more amazing to watch.
This explanation is incredibly relevant to my dissertation, since I am comparing animation techniques; it is worth taking into consideration as I start my practical work as well, since having an open mind to the advantages and disadvantages of each, whilst considering what the audience will think of my film, will ultimately allow me to consider my shots and set it up well.
Purves really loves the concept of theatre and acting; he didn't do well in his initial acting career so decided to translate that passion into animation. He believes stop motion has the most in common with the theatre, since they both use props, make up and sets to portray their stories.
One of my classmates asked Purves to explain the reason he believes practitioners still use stop motion today, despite computer generated imagery being developed. He stated it is because in a way, it's the most relatable animation technique to audiences; seeing puppets and common materials come to life through animation to a lot of people is astounding. Though CGI has many positives, because of the space within the computer, they are able to put cameras where it is not possible in real life, so this and the plastic feel of the characters make CG seem slightly less believable. Whereas with stop motion, all you need to see is a few props and hints of a story, so that the viewer can fill in the gaps themselves and turn it into a story that they will enjoy more.
The audience is naturally more aware of what a stop motion puppet is, what it's made up of and the materials used to build it; this is why seeing it come to life through animation, breathing, talking and feeling emotions, is considered to be more amazing to watch.
Monday 16 November 2015
Final Storyboard
After narrowing down my initial storyboard, I had to lay out the details of the sequence I want to create ready to animate, so here it is:


I think this story will work well because I am testing the limits of each technique, which will hopefully allow me to compare them effectively. I haven't specified some of the actions for each technique because I thought it would be better if I could have the freedom to experiment at the time of filming, to get used to the materials I'm using and see what I can come up with that way, documenting my results as I go.
This idea to experiment is inspired by Aardman, who describe how they discovered how to portray the emotions of Gromit through playing around with plasticine.
I personally prefer my moodboard version of a storyboard, since that example clearly demonstrates the differences in each technique, even with just the images, so I will take this into consideration when developing my animatic.
Friday 13 November 2015
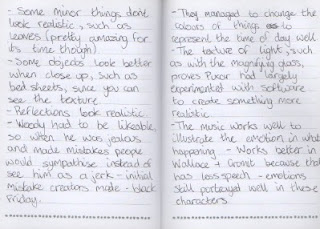
A Grand Day Out with Wallace and Gromit - Analysis
Aardman studios are most commonly known for their contribution to the stop motion animated film industry. Two of their most iconic characters are Wallace and Gromit; created by Nick Park, they have starred in 4 short films and a feature length film.
Their very first appearance was in A Grand Day Out, a simple story of the two characters travelling to the moon to find cheese. After 6 years of production, a combination of Nick Park's solo efforts and then receiving help from the team at Aardman, it was finally finished in 1989.
At the time, the only dominant animation techniques were 2D and Stop Motion, so Park decided to go with the later. This allowed him to keep the characters looking homemade by keeping some of the fingerprints on the plasticine and using various materials to create different textures; in a way, stop motion seems to be the most relatable animation there is, because pretty much anybody can mould their own plasticine figures (including children), so the audience can see how something so simple can be given life and emotions. A Grand Day Out is a good example of this, with such an imaginative storyline it's almost like a child came up with the idea.
Despite this, the comedy is very subtle and cleverly sprinkled throughout the film, most of which a child wouldn't really understand, which makes it suitable for a family audience. What I think people like about Wallace and Gromit is the relationship the characters have; Wallace is the only one who can talk, despite him being clever enough to invent things he's oblivious to what's going on around him, where Gromit the dog is very loyal and looking out for Wallace, as well as being handy himself. Gromit expresses his emotions through his eyebrows and body language, which requires the artist to have a certain skill set to express that emotion effectively through stop motion.
In the sequence where they are building the rocket ship, I can tell Nick Park worked hard to show the potentials stop motion has, by using real materials (as oppose to artificially made in the computer) to create the illusion that the characters are alive.
It wouldn't be nearly as good if it wasn't for the music accompanying the film; Julian Nott is the talent behind this aspect of it. It's the changes in tempo which describe what's happening in the story without having to narrate it, as well as the characters emotions and the iconic Wallace and Gromit theme tune.
Overall I love this film, but if it was made in the current day and age I don't think it would be as successful as it has been, because most films now (even short films) have such a big, movie-like plot that A Grand Day Out would be lost among the CGI. If this film hadn't been made however, it wouldn't have influenced the stop motion animation technique as it has or made Aardman quite as successful as it is.

Thursday 12 November 2015
Leeds International Film Festival...
The films broadcasted at Leeds International Film Festival were of a very high standard. From the line up, four films in particular stood out to me.
The first is 'Tsunami'. This charming film is an example of hybrid animation, creating a 3D animation to give the impression that it's painted on 2D animation software.


'Pawo' has a simple style yet it works well for the concept of the story. It is animated very well in 2D.


The first is 'Tsunami'. This charming film is an example of hybrid animation, creating a 3D animation to give the impression that it's painted on 2D animation software.

The second, 'Snowfall', is animated incredibly well - smooth, slick movements in a soft stylised manner.

'Pawo' has a simple style yet it works well for the concept of the story. It is animated very well in 2D.

Lastly is 'Warm Snow', the only stop motion film on this list, created unusually with sand, which gives the piece a naturally rough look, yet it is accompanied by smooth animation.

All of these films use a variety of animation techniques; the predominant one overall at this event was computer generated animation. The possibilities with technology seem to be endless, with a variety of artists from around the world interpreting this art form in many different ways.
Sunday 8 November 2015
Steamboat Willie - Analysis
Instead of a story, in 'Steamboat Willie' it seems almost as if Mickey Mouse is discovering sound for the first time, which of course is appropriate since this is the first film Disney made accompanied by sound.
I can see the principles of animation being put to good use here, which makes the film feel more creative and in a cartoon style, yet complete and believable; the exaggeration in the characters actions is particularly notable for entertainment.
Compared to modern films, it still stands as a strong cartoon, particularly the use of decent animation and the syncing of sound. I intend to talk about it in my dissertation as a revolutionary piece of work which truly started off Disney's long career of producing animated feature films.
Tuesday 3 November 2015
Updated Storyboard
Since creating my initial storyboard, I decided it was too long to accomplish a decent animation within the time limit I have for this module, so the best course of action was to narrow it down to the basics which represent a brief practical history of animation within the film industry.
This being from the first feature length film, Snow White (which was hand drawn), to stop motion (with plasticine), to CGI (Autodesk Maya); I believe this will be a simple yet fun solution to stand by my dissertation.
I think I can get away with this because the timeline I will illustrate should document the details of the history in animation, and also be a resourceful document for me to refer to later on, and possibly even display to audiences to show I have done thorough research into the facts.
 |
| The red crosses represent the panels I am cutting out of my storyboard |
This being from the first feature length film, Snow White (which was hand drawn), to stop motion (with plasticine), to CGI (Autodesk Maya); I believe this will be a simple yet fun solution to stand by my dissertation.
I think I can get away with this because the timeline I will illustrate should document the details of the history in animation, and also be a resourceful document for me to refer to later on, and possibly even display to audiences to show I have done thorough research into the facts.
Saturday 31 October 2015
Toy Story - Analysis
A more recent iconic moment in animation history is the first computer generated feature length film, 'Toy Story'.

After watching the film again, I can tell that using toys as the first character subject for a feature length film was a good idea, since toys naturally have a rugged movement, which is what the audience would expect to see from the characters, hence making CG look amazing since it can animate something really well.
It's an interesting theory because human characters were evident in Toy Story, however they didn't appear in it much, whereas in 'Toy Story 2' (2000) these background human characters become more prominent, which represents Pixar's development in animation.
I intend to include this quote in my dissertation, since I agree with the fact that the production team did really well to not go overboard on the idea, and to demonstrate what CG is capable of.

One quote I found in 'Animation - From Pencils to Pixels' has an interesting theory about Lasseter's approach to 'Toy Story':
"But recognising the limitations of 3D character design and animation, Lasseter astutely chose toys as the first challenge to the Disney monopoly. Toys have a limited expectation of movement from the audience’s point of view and yet the shapes, surfaces, and textures of toys were within reach of the available knowledge and technology." (White, 2006, p.33)
After watching the film again, I can tell that using toys as the first character subject for a feature length film was a good idea, since toys naturally have a rugged movement, which is what the audience would expect to see from the characters, hence making CG look amazing since it can animate something really well.
It's an interesting theory because human characters were evident in Toy Story, however they didn't appear in it much, whereas in 'Toy Story 2' (2000) these background human characters become more prominent, which represents Pixar's development in animation.
I intend to include this quote in my dissertation, since I agree with the fact that the production team did really well to not go overboard on the idea, and to demonstrate what CG is capable of.
Snow White Analysis
'Snow White' was the first ever feature length animation film. This is a significant part of history, and a film that will be included in my dissertation. I decided the best way to analyse it would be to watch it and make notes, so here were my initial thoughts:


Compared to modern films, I found this to be quite slow, with the human characters being quite bland. However I can understand why it was such a phenomenon at the time; the animation of the dwarfs was particularly outstanding. Despite them looking very similar to each other, the emotion that they have been given makes them stand out as individual characters, making the sequences entailing the dwarfs interacting with each other particularly enjoyable.
After reading 'The World History of Animation' for research, it was interesting to find out the colour was toned down and the story cut shorter because the producers weren't sure if audiences would be engaged with an animated story for very long.
Watching it has made me realise that character animation is important, which I will apply to my practical work.
Thursday 29 October 2015
Initial Mood Board
After spending so much time thinking about my ideas, it was finally time to document them into a storyboard.
This is only an initial storyboard describing a range of ideas vaguely (mainly focusing on what order I want the techniques to play in), but due to the amount of time I have left on this module I will have to cut out some of the techniques I initially wanted to do.
For example in the 6th panel I wanted to stand the cut out character up and animate it in a stop motion style with a boarder, but since I have never used this technique before it would become even more time consuming.

I decided the best way to explain my ideas would be through images found on the internet, rather than drawing them all out, since a lot of the mediums I want to use involve stop motion and Maya.
This is only an initial storyboard describing a range of ideas vaguely (mainly focusing on what order I want the techniques to play in), but due to the amount of time I have left on this module I will have to cut out some of the techniques I initially wanted to do.
For example in the 6th panel I wanted to stand the cut out character up and animate it in a stop motion style with a boarder, but since I have never used this technique before it would become even more time consuming.

Wednesday 28 October 2015
History of Animation Timeline
After my second tutorial, I did some research into the history of animation to potentially create a timeline of information, which I can refer to later and display in exhibitions to inform audiences.
I found various timelines that have already been created, they all have some useful information that I could use, which I can combine into my own giant timeline.


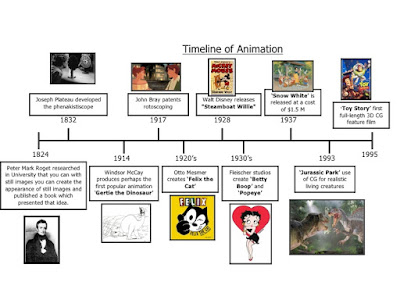
Another example of a detailed timeline is on this website: http://joshuamosley.com/UPenn/courses/Ani/AnimationHistory.html which describes some of the points in the photos above, as well as information going as far back as the year 1824.
A piece of literature listed on my bibliography will be very useful for drafting out my timeline as well, The World History of Animation.

Once I have gathered all sources of information to one place, I feel I can document a detailed timeline of significant moments in animation history.
I found various timelines that have already been created, they all have some useful information that I could use, which I can combine into my own giant timeline.


As well as these dates, I will look into other significant contributions to the animation industry, which broke boundaries and inspire many people today to pursue their own contributions to society; this includes more stop motion pieces and maybe conferences/festivals where animation has been discussed and celebrated.
Another example of a detailed timeline is on this website: http://joshuamosley.com/UPenn/courses/Ani/AnimationHistory.html which describes some of the points in the photos above, as well as information going as far back as the year 1824.
 |
| The website joshuamosley.com |
A piece of literature listed on my bibliography will be very useful for drafting out my timeline as well, The World History of Animation.
Once I have gathered all sources of information to one place, I feel I can document a detailed timeline of significant moments in animation history.
Tutorial 2
For my second tutorial, I discussed how to proceed with my practical ideas and suggestions on what to research deeper into.
First and foremost, I should create a storyboard. This can be in the form of a mood board with various images found from the internet, for the purposes of documenting my ideas.
I could create a timeline documenting the history of animation, exploring what exactly is so significant in history and why, which I can refer to and pick out information as and when I need it. This will allow me to find more facts about the box office results and budgets spent on various films, to compare what was successful in that aspect.
I also need to read through a few more text books, add my own notes to them and type them onto my blog, so that I can read through them more than once and compare what information I find in each. I'll do this so I can understand the information more clearly when writing it in my dissertation.
With all of this in mind, I think I'm ready to go onto the next stage of my project.
Thursday 15 October 2015
Scheduling My Time...
To start off this module, I mapped out a rough schedule of when I should spend time on which module for November and December:


This is only a rough draft, I still need to consider which animation festivals/events to go to and allow myself some time to be flexible with what work I do, but it's a start.
I unfortunately have already fallen behind, since I caught an unexpected cold I was unable to work for a week in October so I need to allow time to catch up, hence why flexibility to do work is important.
Wednesday 14 October 2015
Tutorial 1
The feedback on my ideas and proposal form were generally good, the main issue I am having with it so far is figuring out exactly what my argument is; once I figure out what point I'm trying to make by writing this dissertation then I will be able to narrow it down easily.
Some interesting points were made during the tutorial, including to narrow down my examples to purely animation, rather than visual effects, which means talking about studios such as Laika and Aardman rather than Ray Harryhousen, since a lot of his work is based on visual affects.
It was pointed out that I should also speak to practitioners in the industry, such as Paul Wells, Barry Purves, Aardman, Laika, and small studios too. Not necessarily in person, I could send emails and tweets to get as many responses as I can, without taking up a lot of their time.
After showing my tutor my bibliography, I realised a lot of the books I am referencing from are 'How to' books instead of theoretical. I haven't managed to find many books that are purely about theory yet, but I will explore the Leeds college of Art library in more depth to see what I can find.
Friday 2 October 2015
Re-Briefing/Presentation
After giving a presentation on my first official scheduled lesson for the new module, Context of Practice 3, on my initial ideas and plans for the next few weeks I got some feedback from my peers.
It was mostly suggestions on animations I could watch that would be good examples relating to my practical work, but overall they seemed to easily understand and be interested in the topic of my dissertation.
I pointed out that I find the TV industry quite interesting as well, so I have to decide if to change my chapters to incorporate this or stick with American blockbuster films throughout history.
Sunday 22 March 2015
The Final Outcome
This is what the final version of the model looks like:


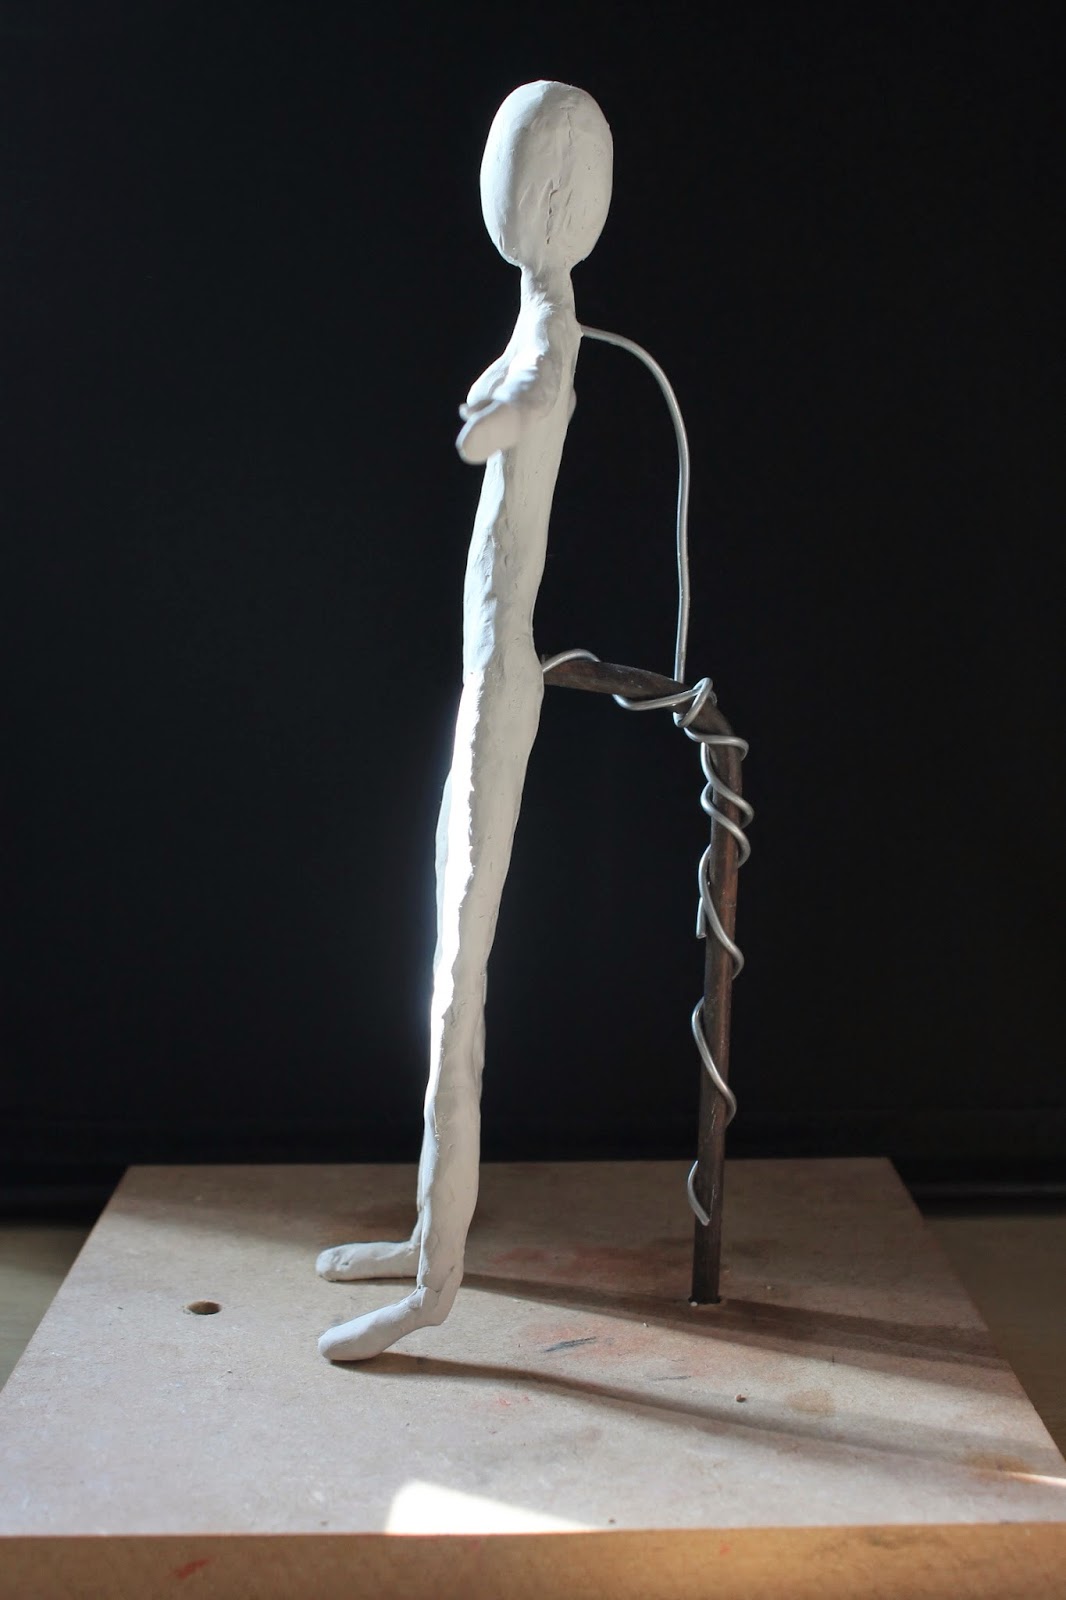

As you can see below, from the side she looks very flat. During construction I realised I had set the wire frame too close to the supporting rod, so I could not effectively replicate the back in the right proportions. So instead I decided to mainly focus on what how she looks from the front; this allowed me more time to get the body shapes right in comparison.
The process of making the model was enjoyable. The arms and legs were harder to manipulate and get right then I had anticipated, but after I had established them the rest of it was relatively straight forward. It was difficult to make the model smooth, since I kept working on different sections which messed up the other areas.
If I could go back over it and improve the model, I would have been more careful with positioning the wire frame, and spent more time applying plasticine to the legs, as I feel that I could have emphasised them more. Looking back at the images, the torso could also have been further emphasised; I would have added more to the left side with the realistic proportions, because now both sides of the model look very thin.
However I am still happy with the final outcome overall, I was able to practice my skills as I applied and smoothed the plasticine onto the wire frame, as well as discovering where I can improve next time I make one. The concept of comparing the two figures and representing how ridiculously different they are is still there, and hopefully that will spark an interest in people that view it.
Process of Making the Model Continued
 |
| Plasticine application of the breasts and legs |
After finishing the torso, I could add more plasticine to get the right leg shapes. The two are very different in the drawing, which I believe I have portrayed fairly-well in my model. Having said that, looking back at it I could have emphasised the difference between them even more with more plasticine on the left or less plasticine on the right.
The breasts proved to be slightly more difficult to mold; since they both join in the middle so close together it was hard to smooth them both out. However, starting with the right (Barbie's), I could pin point how big it should be, so I could compare and contrast the second breast to look more natural.
Once this was done, I could roll out a head with my remaining plasticine. I decided the easiest way to make it would be to roll out a ball of the right shape, cut it in half, then molded it back together over the wire frame. This turned out to be fairly easy, and it gave me the chance to finish off making the neck so it looks better than previously.
 |
| Applying the head and hands |
I decided applying the feet at the end would be easier, since most of the time I had to move the model around to smooth the plasticine out. This way I could put the feet on at the end and stick them to the board, so that it stands in place as it is finished. Adding them on didn't take long and getting the right shape wasn't too hard, but only the flat foot actually stays on the ground.
 |
| Addition of the feet |
Saturday 21 March 2015
Process of Making the Model
 |
| Wire frame with millilput |
After getting all of the tools I need; a wooden base, metal rod, aluminium wire, fresh milliput and carving tools, the first task I had to do was bend and cut the wire into the right shape.
The wire was fairly easy to manipulate, since it's thick, soft, and easy to cut with scissors; so I could bend it around the metal rod on the stand to attach to my model.
The way in which I attached it all was with milliput. After making 3 wire parts to stick together (the torso/head, the legs and the arms) I mixed the two elements of the milliput together to form a mixed substance. This hardens after an hour, so applying it to the wire in the right places can form the muscle of your armature (for example the image on the top left).
A problem that occured while applying the milliput was that the top half of the model was very heavy, so wouldn't stay up right as the milliput was setting; to resolve this I wrapped another piece of aluminium wire around the rod and set it into the top half of the torso. This allowed it to stay upright so it could set properly.
 |
| Base layer of plasticine |
Despite this I carried on with my plan to shape the top half of the model. The arms were the hardest part to manipulate since I had to apply elbows to it, which was awkward to shape. However once I had done this I could start building up the shoulders, which made the neck look better.
The torso overall was the most fun part for me to do; This is where I could get the most emphasis on the shapes to really show the difference between the two figures. I didn't encounter any problems with this section, it was just about applying the right amount of plasticine and spreading it evenly.
So far I believe I have done well with developing my model. Using my drawing as reference to make sure each shape it right. I am looking forward to carrying it on and getting to the next stage of the process!
 |
| Applying the basic shape of the torso |
Wednesday 18 March 2015
Analysis of a Text
Don't Bet On The Prince
This is a book I have read in research for my essay. It contains a series of essays and fairy tales that have been written since the 1960s, when the feminist movement started. Published in 1987 and edited by Jack Zipes, this famous author compiled these texts together to demonstrate how recent male and female writers have reflected on and re constructed traditional fairy tales, which have clear, sexist gender roles; showing the male to be dominant in the stories, with the women as props to the plot.
With authors referenced such as Joanna Russ, Tanith Lee and Jane Yolen, this book gives examples of how we can adapt old literature to create a new outlook on the world. It is targeted at people who are interested in an alternative fairy tale, who question what has caused such different, sexist expectations from both genders and an alternative view on the traditional values of society.
The text is organised into a series of chapters, ordered from feminist fairy tales for young and old readers (parts 1 and 2) to the criticising essays. This makes the book flow nicely and easy to read as it shows you examples of the feminist fairy tales first before taking you to criticise them.
The author of this text is mainly analysing the opinions of others and inputing his own thoughts to compare with others; he can tell that some of the writers might not consider themselves a feminist, despite every author demonstrating similar views of feminism to each other. Saying this, it is mainly in the introduction that Zipes gives his input to the other authors work, allowing the readers to form their own opinions of the works as they read the book.
I have personally found this book useful to depict and form opinions on, because some clear statements are presented in an easy to read format, which has allowed me to understand Zipes's opinion and add my own points to it. It has been interesting to see alternative fairy tales, particularly the interpretation of Snow White from 1972. This interpretation shows Snow White standing up for what she wants, to be with her friends, rather than become a princess as the Queen would have granted. Minus the Queen's death at the end, this story would be a much better one to read to children compared to the Disney version, since it demonstrates empowerment to good people.
In conclusion, I believe this is a good book to read to gain an alternative view on fairy tales. Compared to 'Grimm's Fairy Tales' by Brother's Grimm, these stories are generally much more child-friendly and empowering to women, with analysis at the end of the book describing how feminist values are not present in old stories such as the Grimm tales.
A lot of references are used, whole previously written texts even, which means Zipes must have done some good research into writing this book, and that is why I trust the opinions that are stated in the text.
Friday 13 March 2015
A Change in Plans...
So far I have talked about making two armature's of realistic proportions and a Barbie-shaped one. However after evaluating my idea, I decided merging the two into one model would be the best way to go.
This should make my work more interesting and dynamic, which will hopefully give viewers a direct comparison of how different the two body proportions are, raising awareness of the issues within society.
It also allows me the chance to practice the process of making an armature model; mixing milliput, creating a wire frame and base, then applying plasticine to it.
The fact that I am only making a model, without animating it, gives me more time to focus on making the one piece of work look good while still making it relate well to my essay subject.
Here is the final model design, with the wire frame drawn on as reference:
Sunday 1 March 2015
My Final Idea
For my final piece, I would like to make two models. One with realistic body proportions, and one shaped like a barbie doll.
In my essay I discuss the issues with different body shapes, and how the media enforce high expectations of how your body should look. So I am going to make both of these to compare the proportions and show how ridiculous Barbie's shape is, so I can encourage the fact that natural beauty is better.
 |
| Realistic Figure |
 |
| Barbie Figure |
In my essay I discuss the issues with different body shapes, and how the media enforce high expectations of how your body should look. So I am going to make both of these to compare the proportions and show how ridiculous Barbie's shape is, so I can encourage the fact that natural beauty is better.
I intend to make them with plasticine, using milliput, wire and two wooden bases to construct them.
Tuesday 10 February 2015
Practical Ideas
Since the practical side of my essay has to relate to everything I have researched and written so far, there are a few different ways I could take this project:


I like the idea of looking further into different body shapes, either as a series of illustrations or a model of some sort. Here are some images that have inspired some of my ideas:
Subscribe to:
Posts (Atom)